Tuesday, March 29, 2011

Final Poster and References


References:


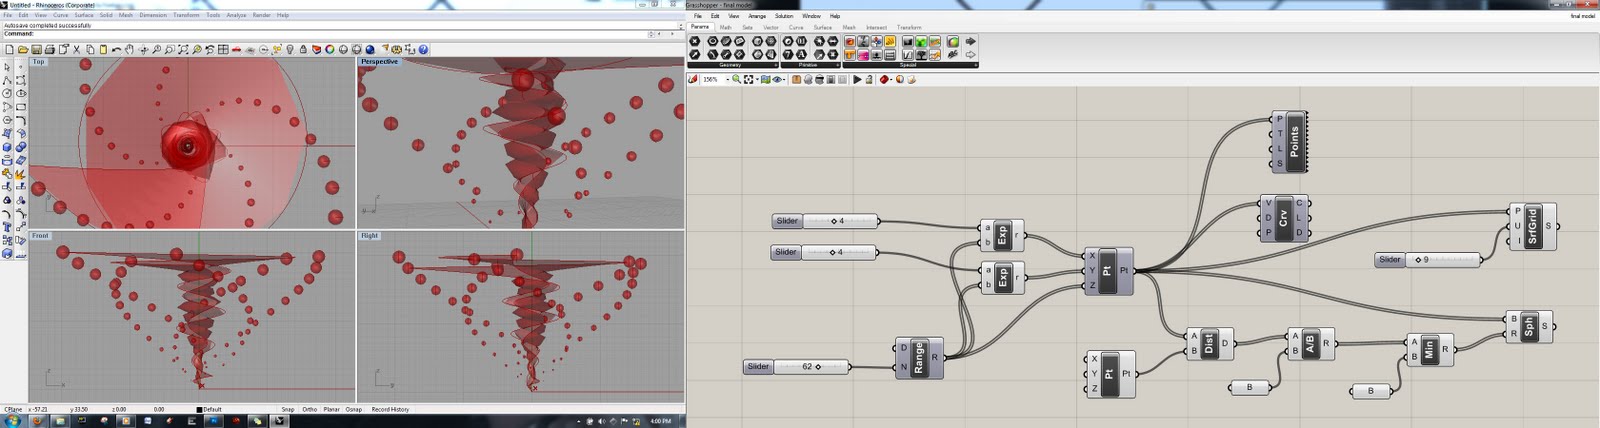
These tutorials lead to my final assignment in the way that I used the information from both of them, and figured out how to combine them to create my iterations and compliment my concept.

http://www.designalyze.com/?p=3#more-3
This tutorial was the one that created the original spiral.

http://www.wonderhowto.com/how-to-make-scaling-circular-patterns-rhino-grasshopper-255310/view/
This was the tutorial that helped me scale circles according to how close they were to a point.

Then I made the circles from the second tutorial the points creating the spiral in the first tutorial, and decided to change the circles to spheres.
Then I changed the point system so that the point could not be moved because I wanted the larger spheres to be at the top only and to get smaller as they got to the bottom, just like the arcs do on sunflowers as they get closer to the middle.

Here is my file uploaded to a file sharing website for downloading:
http://www.gamefront.com/files/20173127/3333620RebeccaPennPoster.pdf

Sunday, March 27, 2011

More Renders


Beginning to Render


This is my first render test. I tried using white as the colour for the model, but when I added light you could not see the shape of the model at all, so I tested dark grey and I think this looks good because it encourages shadows in the render and therefore helps to show the shape of the model. I am considering looking at other materials for the model, but I don't want to deter away from the form by adding more confusing materials.


Model Materials I used:
I decided to be plain with my materials for this assignment, and simply create a palette of white and dark gray. I used the white for the ground plane that I made in 3D studio max, and then made the model gray.

Iterations I Baked for Exporting

Here are screenshots of the models I baked from Grasshopper and exported as .3ds models for rendering in 3DS Max. I will choose from these for my final 12 iterations for my poster, and find the ones from these interesting forms that my flowgraph has formed that compliments and contrasts with my concept.


Friday, March 25, 2011

The Concept


When originally looking at the sunflower, I found this photo on the website: http://www.maths.surrey.ac.uk/hosted-sites/R.Knott/Fibonacci/fibnat.html

and when observing the curves that have been pointed out in this image of the seeds on a sunflower I noticed that the diameter of the curves that are formed by the pattern of the seeds actually gets smaller as you look further into the middle of the circle (meaning that the curves get curvier as they get closer to the centre). Therefore the curves start off large on the outside and progress to getting smaller in the middle.

Therefore with my model I wanted to represent these curves in 3D somehow, and also wanted to represent the seeds. The curves created by the seeds are represented by the spiral in the middle of the model- the obviously starts off large on the outside and gets smaller as it gets further to the middle, just like on the seed bed. The circles on the outside of the spiral represent the seeds themselves (very literally) as they are the points that the spiral references for its form, just like on a sunflower. These spheres get smaller as the spiral gets closer to the end and this is a very specific part of the model's design because I wanted to show that the curves the sunflower seeds make get curvier as they get closer to the centre, therefore the diameter gets smaller, and in this 3D representation I used this diameter aspect on the spheres themselves.

Iterations and Tests


Wednesday, March 23, 2011

2 Tutorials from Discussion Forum

Generating a Spiral in Rhino's Grasshopper Plugin
http://www.designalyze.com/?p=3#more-3
This is the first tutorial that I found in the forum relevant to me as it teaches you how to make a spiral!

The second image is essentially the same as the first, but with the points preview turned off in Grasshopper so that it does not detract from the spiral itself.

Meshing Circles Into Each Other and Intersecting

http://www.youtube.com/watch?v=rWsPy7IA89E

This is another tutorial I found in the Discussion on Blackboard.

Using the tutorial I created a grid of circles and made them intersect and created a surface from that.

My Blackboard Tutorial

http://www.wonderhowto.com/how-to-make-scaling-circular-patterns-rhino-grasshopper-255310/view/

This is the tutorial that I posted on the Student Blackboard Suggested Tutorials, and these are the results of it:

Those are the results of the experiment, and for the ones below I decided to add another series for the Z axis, which created a sort of cube of the circles. It was quite hard to see the effect, so for the second image I created less levels. I thought that it looked cool.